Keeping the back end rolling

One of the downsides of having a rear bathroom is that the dump fitting is in the rear corner of the trailer, which exposes it to potential bottom-out damage when pulling onto or off of a sloped surface.  The problem is serious enough that I would pull out of our driveway without the weight distribution bars on, as the rear axle sag on the SUV would raise the back end of the RV up enough to avoid bottoming out if I was careful.

The designers of the RV installed V-shaped skid points so that the plumbing would be protected from bottoming out:

image

By the end of last summer’s vacation, we had bottomed out enough times that these members had been bent to the point of being useless.  I welded reinforcing stock on as well as castors:

image

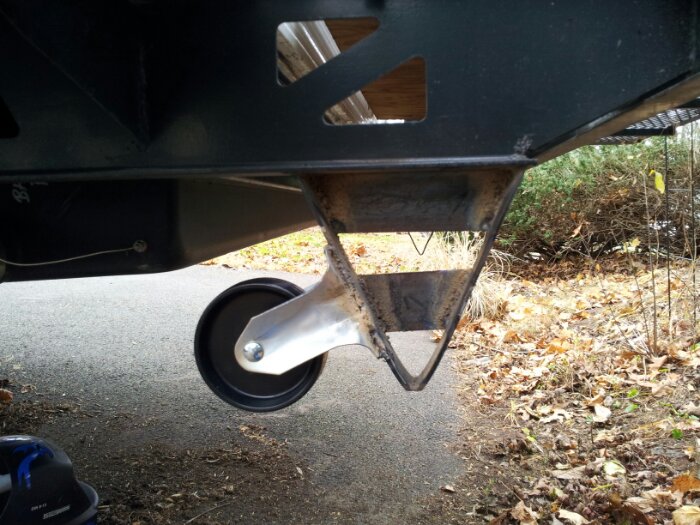
When I took the trailer out for inspection, the casters worked very well.  Let’s hope they hold up!

Furniture moving wrap-up

I finally finished hooking up the furnace which is now under the moved dinette bench. Two of the ducts now terminate in the front face, and the third comes out in the bedroom:

image

In addition to the two furnace outputs, I had to install a grill to finish the hole I cut in the bench to act as the air intake:

image

Cabinets and drawers

Having moved one of the seats from the dinette to the sofa’s former location, I had to reframe the seat to accommodate the RV’s furnace which was now underneath it, as well as redo the front face of the seat since the old version of the seat was built into the wheel well on the right side of its face. Fortunately, I had some veneer to spare, as the platform that supported the sofa had the same veneer as its upper surface.

Here’s the completed bench:

image

Trish also mentioned that she would like the drawers under the sink removed in favor of more cabinet space, so I pulled out the shelves to take a look:

image

The “fun” never ends!

Bed lifts

28 weeks, 6 days to go!

I visited the website to check the countdown, and accidentally typed in “workbeforeyoulive.com”.  I’m so glad that’s not my reality for much longer!

I spent most of yesterday working in the RV.  Our largest storage area in the RV is under the last 30 inches of the bed.  The forward majority of the bed rests on an elevated “floor” which is the roof of the forward pass-through compartment which is accessed by a pair of hatches on either side of the outside of the RV.  The foot of the bed rests atop a toy chest-sized enclosure.  Lifting the toy chest’s lid is really hard, as the matresses are being bent up as the lid is lifted.  Getting stuff in and out is accomplished by resting your knees on the floor, lifting the lid with both hands, resting the lid on your shoulder, and quickly loading and unloading before your shoulder starts to bruise.  I used a fish scale to measure the force necessary to lift the lid, and I exceeded the scale’s 60 pound limit.

This problem is a thing of the past thanks to a pair of 120lb gas struts.  Now the lid lifts with one hand and stays up.  The lid also goes down with just a few pounds of pressure.

20121216_115900

20121216_115936

20121216_120110

20121216_120043

Now all I have to do is find some kind of trim for the leading edge of the lid, as its rough wood edge catches on the underside of the matresses.  Once that’s solved, it should be perfect!

Increasing our openness

29 weeks, 5 days to go!

Our RV doesn’t have a slide, and there’s quite a bit packed in there, so there’s not much floor space:

image

p_025

Trish was worried that the lack of floor space might get a bit oppressive after a year.  Buying a larger RV is out, so instead I removed the sofa and moved one of the dinette’s bench seats next to the sink.  It was a little scary ripping out the furniture, but it worked out in the end and It looks like this now:

image

20121211_090634

The furnace was under the sofa and is now under the bench next to the sink, so I have to reroute the furnace duct in the photo above.

I’ll be adding wall mounted fold down tables in front of each bench, a large table where the old table was, and a narrow table in front of the bench next to the sink.  We will use folding chairs on the other side of the big table so that all four of us can sit together for dinner, etc.  This also gives us the option of installing floor to ceiling cabinetry along the wall formerly behind the sofa.

This should work out quite well, as we now have two “stations” for home school, and at the same time we’ve freed up a tremendous amount of floor space.  We’ve lost the ability to sleep guests on the sofa and dinette, but that wasn’t a feature we were planning on using anyway.